> ## Documentation Index
> Fetch the complete documentation index at: https://docs.vibescale.run/llms.txt
> Use this file to discover all available pages before exploring further.
# Reading the Security Report
> How to interpret the grade, finding categories, and severity levels — and how to act on each issue found.
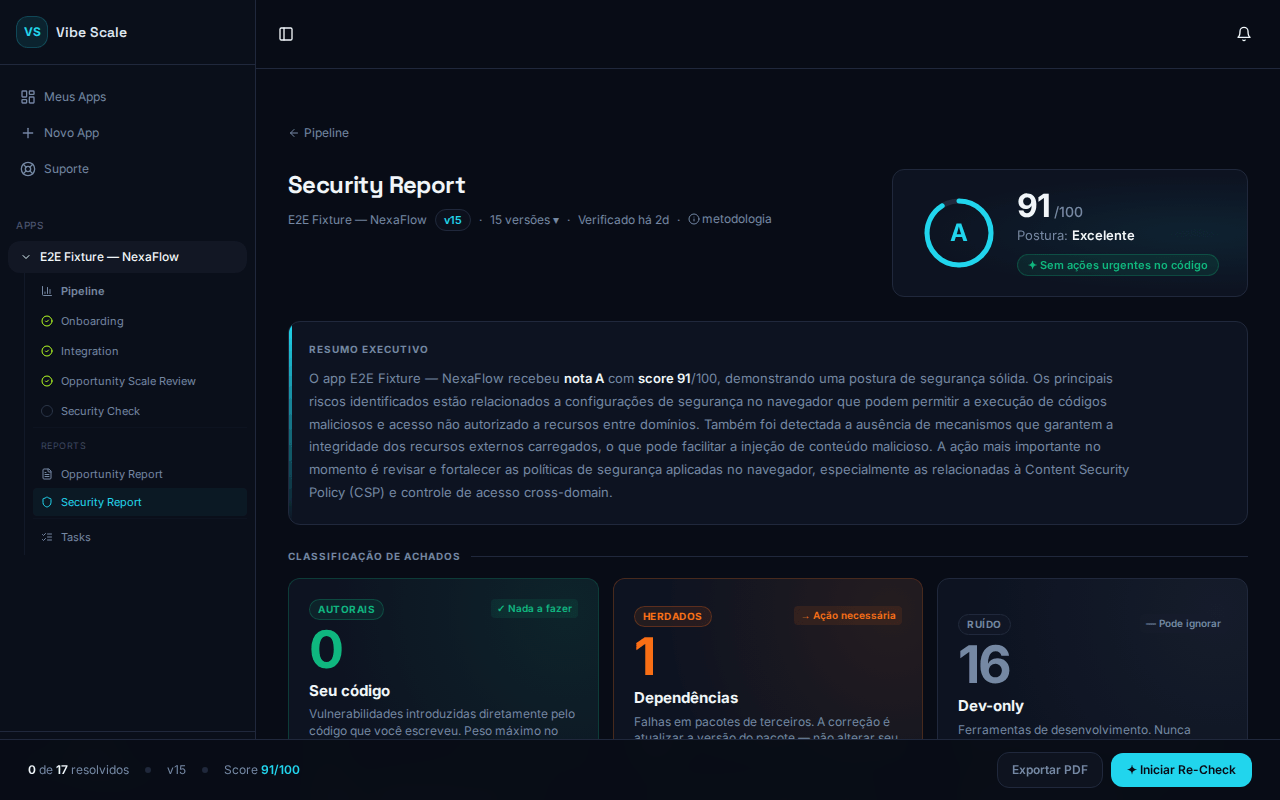 ## Grade and Score
The report header displays:
* **Grade letter** — from **A** (best) to **E** (critical), with labels in English:
| Grade | Label |
| ----- | ---------------- |
| A | Excellent |
| B | Good |
| C | Attention Needed |
| D | Poor |
| E | Critical |
* **Numeric score** — from 0 to 100.
* **Summary** — a sentence reflecting the overall status:
* *"X custom items need attention"*
* *"Only inherited dependencies — no urgent actions"*
* *"No issues detected"*
Click the **methodology** link next to the summary to see exactly how the score is calculated.
## Finding Categories
Each finding belongs to one of the three categories below. Understanding the difference is the most important step to prioritize correctly.
Vulnerabilities introduced directly by the code your team wrote. **Prioritize these.** They carry the highest weight in the score. If the Custom count is greater than zero, the score will be significantly affected.
Flaws in third-party packages your project imports. They deserve review — especially critical and high severity — but fixing them depends on updating the package version, not directly changing your code.
Findings from packages used only during development that never reach production. **They do not affect your score.** They are hidden by default.
To view them, click **"Show X noise items (dev-only)"** at the bottom of the list.
## Severity Levels
Within each category, findings are ordered by severity:
| Severity | Meaning |
| ------------ | -------------------------------------------------------- |
| **Critical** | Immediate risk of compromise. Fix before anything else. |
| **High** | Serious risk that should be resolved in the next sprint. |
| **Medium** | Moderate risk. Plan the fix. |
| **Low** | Limited impact. Fix when convenient. |
| **Minimal** | Informational. Very low practical impact. |
## EPSS Badges
Some findings display an additional badge indicating real-world exploitation risk:
**≥ 90th percentile of EPSS.** This finding is among the most likely to be exploited in the next 30 days, according to FIRST.org data. Prioritize fixing it immediately.
**Between the 50th and 90th percentile.** Above the industry median. Worth scheduling a fix.
EPSS measures the **actual probability of exploitation**, not just technical severity. A Medium severity finding with an **Active Exploitation** badge may be more urgent than a High severity without a badge.
## Finding Details
Click any finding to see:
* Title and severity badge (e.g., CRITICAL RISK, HIGH RISK)
* Problem description
* Affected location — file path or module name
* Code snippet — when available
* Suggested fix
* Classification — Custom / Inherited / Noise
> **Important:** The suggested fix is only shown if it is considered useful and does not duplicate the finding’s title or description. This avoids repetitive information and improves report clarity.
## Available Actions
### Mark as Resolved
Click the checkbox next to the finding to mark it as resolved after applying the fix.
### Create a Task in Kanban
Click **Create Task** to send the finding directly to your Kanban board. Priority is mapped automatically:
| Severity | Kanban Priority |
| -------- | --------------- |
| Critical | P1 |
| High | P2 |
| Medium | P3 |
After creating the task, a status badge appears on the finding: **To Do / In Progress / In Review / Done**.
### Use AI Fix Prompt
Click **AI Agent Fix Prompt** to copy a remediation prompt ready to paste into your preferred code assistant — Copilot, Cursor, Bolt, or similar. The prompt includes the finding context and fix instructions.
> **Note:** The fix prompt is only shown when the suggested remediation is considered useful and not repetitive compared to the finding’s title or description.
## Unlocking the Re-Check
The **Re-Check** button remains locked until **all Critical and High findings** are marked as resolved or dismissed.
Re-Check will not be enabled while any Critical or High findings remain unresolved — regardless of category. Resolve or dismiss each to unlock this option.
## Grade and Score
The report header displays:
* **Grade letter** — from **A** (best) to **E** (critical), with labels in English:
| Grade | Label |
| ----- | ---------------- |
| A | Excellent |
| B | Good |
| C | Attention Needed |
| D | Poor |
| E | Critical |
* **Numeric score** — from 0 to 100.
* **Summary** — a sentence reflecting the overall status:
* *"X custom items need attention"*
* *"Only inherited dependencies — no urgent actions"*
* *"No issues detected"*
Click the **methodology** link next to the summary to see exactly how the score is calculated.
## Finding Categories
Each finding belongs to one of the three categories below. Understanding the difference is the most important step to prioritize correctly.
Vulnerabilities introduced directly by the code your team wrote. **Prioritize these.** They carry the highest weight in the score. If the Custom count is greater than zero, the score will be significantly affected.
Flaws in third-party packages your project imports. They deserve review — especially critical and high severity — but fixing them depends on updating the package version, not directly changing your code.
Findings from packages used only during development that never reach production. **They do not affect your score.** They are hidden by default.
To view them, click **"Show X noise items (dev-only)"** at the bottom of the list.
## Severity Levels
Within each category, findings are ordered by severity:
| Severity | Meaning |
| ------------ | -------------------------------------------------------- |
| **Critical** | Immediate risk of compromise. Fix before anything else. |
| **High** | Serious risk that should be resolved in the next sprint. |
| **Medium** | Moderate risk. Plan the fix. |
| **Low** | Limited impact. Fix when convenient. |
| **Minimal** | Informational. Very low practical impact. |
## EPSS Badges
Some findings display an additional badge indicating real-world exploitation risk:
**≥ 90th percentile of EPSS.** This finding is among the most likely to be exploited in the next 30 days, according to FIRST.org data. Prioritize fixing it immediately.
**Between the 50th and 90th percentile.** Above the industry median. Worth scheduling a fix.
EPSS measures the **actual probability of exploitation**, not just technical severity. A Medium severity finding with an **Active Exploitation** badge may be more urgent than a High severity without a badge.
## Finding Details
Click any finding to see:
* Title and severity badge (e.g., CRITICAL RISK, HIGH RISK)
* Problem description
* Affected location — file path or module name
* Code snippet — when available
* Suggested fix
* Classification — Custom / Inherited / Noise
> **Important:** The suggested fix is only shown if it is considered useful and does not duplicate the finding’s title or description. This avoids repetitive information and improves report clarity.
## Available Actions
### Mark as Resolved
Click the checkbox next to the finding to mark it as resolved after applying the fix.
### Create a Task in Kanban
Click **Create Task** to send the finding directly to your Kanban board. Priority is mapped automatically:
| Severity | Kanban Priority |
| -------- | --------------- |
| Critical | P1 |
| High | P2 |
| Medium | P3 |
After creating the task, a status badge appears on the finding: **To Do / In Progress / In Review / Done**.
### Use AI Fix Prompt
Click **AI Agent Fix Prompt** to copy a remediation prompt ready to paste into your preferred code assistant — Copilot, Cursor, Bolt, or similar. The prompt includes the finding context and fix instructions.
> **Note:** The fix prompt is only shown when the suggested remediation is considered useful and not repetitive compared to the finding’s title or description.
## Unlocking the Re-Check
The **Re-Check** button remains locked until **all Critical and High findings** are marked as resolved or dismissed.
Re-Check will not be enabled while any Critical or High findings remain unresolved — regardless of category. Resolve or dismiss each to unlock this option.